
AWS IAM Policies, Explained: How to Read Them, Write Them and Debug Them
- Intro
- The one sentence version
- What a policy looks like
- Actions, resources and ARNs
- Where policies live
- How AWS decides: allow or deny
- Conditions
- A real-world example
- Habits that’ll save you pain
- Wrapping up
Intro
If you’ve spent any time on AWS, you’ve hit an AccessDenied error and had no idea why. I certainly have, more times than I’d like to admit. For a long while my fix was to keep adding permissions until the error went away, which works right up until you realise you’ve given something far more access than it ever needed.
Another article by J Cole Morrison helped me get past that stage: “AWS IAM Policies in a Nutshell”. Like the rest of his blog, it’s no longer online, but it’s still on the Wayback Machine and worth a read.
This is my own write-up of how IAM policies work. I’ll cover:
- What a policy actually says, piece by piece
- Actions, resources and ARNs (plus the S3 gotcha that trips everyone up)
- The different places a policy can live
- How AWS decides whether a request is allowed
- Conditions
- A real-world example, and some habits that’ll save you pain
The one sentence version
Every IAM policy answers the same question: who can do what, to which resource, and under what conditions?
That’s it. Everything else is syntax. Keep that sentence in your head and even a scary-looking 200-line policy starts to make sense.
What a policy looks like
Policies are JSON documents. Here’s a small one:
{
  "Version": "2012-10-17",
  "Statement": [
    {
      "Sid": "ReadReports",
      "Effect": "Allow",
      "Action": ["s3:GetObject", "s3:ListBucket"],
      "Resource": [
        "arn:aws:s3:::acme-reports",
        "arn:aws:s3:::acme-reports/*"
      ]
    }
  ]
}
Going through it line by line:
Version: the version of the policy language, not a date you’re supposed to update. Always use2012-10-17. The only other one,2008-10-17, is ancient and doesn’t support things like policy variables.Statement: a list of rules. A policy can have as many as you like (within the size limits).Sid: an optional label for the statement. It’s only for humans, so use it to say what the statement is for.Effect: eitherAlloworDeny.Action: which API calls this statement covers.Resource: which things those calls can be made against.
There’s also an optional Condition block, which we’ll get to, and a Principal element that only shows up in certain kinds of policies. More on that in a bit too.
Actions, resources and ARNs
Actions
Every action is written as service:ApiCall, like s3:GetObject, ec2:StartInstances or dynamodb:Query. The service prefix is usually the obvious name, but not always (it’s es for OpenSearch, for example). The Service Authorization Reference lists every action for every service, and I keep it bookmarked.
You can use wildcards: s3:Get* covers every S3 action starting with Get, and s3:* covers all of S3. They’re handy, but be careful. s3:* includes s3:DeleteBucket and s3:PutBucketPolicy, which is probably more than you meant.
Resources and ARNs
Resources are identified by their ARN (Amazon Resource Name). Most ARNs follow this shape:
arn:partition:service:region:account-id:resource
arn:aws:dynamodb:ca-central-1:123456789012:table/orders
Some parts can be empty. S3 bucket names are globally unique, so S3 ARNs skip the region and account entirely: arn:aws:s3:::acme-reports.
The S3 gotcha
Look at the example policy again. Why are there two resources?
Because in S3, the bucket and the objects inside it are different resources. Some actions work on the bucket itself (s3:ListBucket lists what’s in it), and some work on objects (s3:GetObject reads a file):
| ARN | What it means | Actions that use it |
|---|---|---|
arn:aws:s3:::acme-reports | The bucket | s3:ListBucket, s3:GetBucketLocation |
arn:aws:s3:::acme-reports/* | Every object in it | s3:GetObject, s3:PutObject, s3:DeleteObject |
If you only list the /* version, reading a file works but listing the bucket fails. If you only list the bucket, you can list the files but not open any of them. I’ve lost a genuinely embarrassing amount of time to this one.
Where policies live
The same JSON can be attached in different places, and where it’s attached changes what it means.
Identity-based policies
These are attached to an IAM user, group or role, and answer “what can this identity do?”. They don’t have a Principal element, because the principal is whoever the policy is attached to.
They come in three flavours:
- AWS managed policies, like
ReadOnlyAccessorAmazonS3ReadOnlyAccess. AWS writes and maintains them. They’re a good starting point, but tend to be broader than you need. - Customer managed policies: ones you write, which you can attach to as many identities as you want. This is where most of your policies should live.
- Inline policies, embedded directly in a single user, group or role. They’re deleted along with it and can’t be reused, so I only use them for one-off, very specific permissions.
Resource-based policies
These are attached to the resource itself, like an S3 bucket policy, an SQS queue policy or a KMS key policy. They answer “who can use this resource?”, so they must have a Principal element saying who they apply to:
{
  "Version": "2012-10-17",
  "Statement": [
    {
      "Sid": "LetAppRoleRead",
      "Effect": "Allow",
      "Principal": { "AWS": "arn:aws:iam::123456789012:role/app-role" },
      "Action": "s3:GetObject",
      "Resource": "arn:aws:s3:::acme-uploads/*"
    }
  ]
}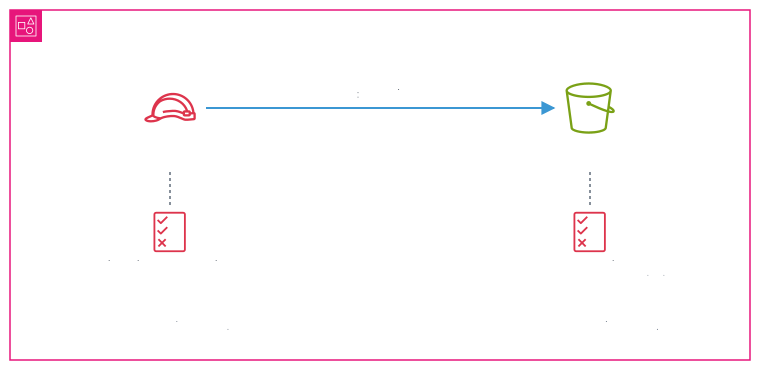
Resource-based policies are also how you share things across AWS accounts. When a role in one account wants to read a bucket in another, the role’s identity-based policy has to allow it, and the bucket policy has to allow that role. Both sides have to agree.
The guardrails
There are a few more policy types you’ll run into as your setup grows. They have one thing in common: they can only take permissions away, never grant them.
- Service control policies (SCPs): set in AWS Organizations, they cap what any identity in an account can do, even the account’s admins.
- Permissions boundaries: attached to a user or role to set the maximum permissions it can ever have, no matter what other policies say.
- Session policies: passed in when assuming a role, to narrow down that one session.
A classic use for a permissions boundary: you let developers create their own IAM roles for their apps, but with a boundary attached, so they can’t create a role that’s more powerful than they are.
How AWS decides: allow or deny
This is the part that finally made IAM make sense to me. Every request goes through the same logic:
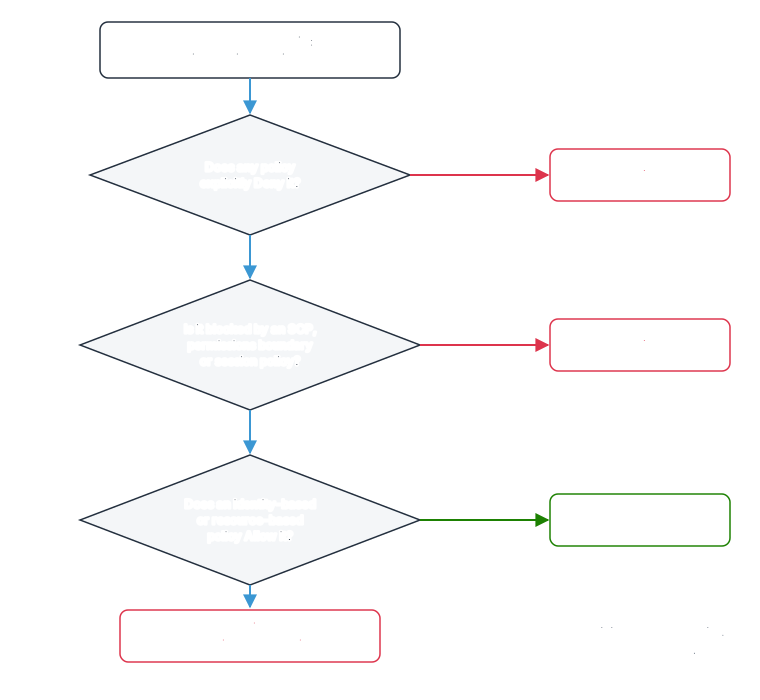
In plain words:
- Everything is denied by default. If nothing says “yes”, the answer is no. That’s why a brand new IAM user can’t do anything.
- An explicit
Denyalways wins. It doesn’t matter how many policies allow something. One matchingDenyanywhere, and the request is refused. - The guardrails have to let it through. If an SCP, permissions boundary or session policy doesn’t allow the action, it’s blocked, even if an identity-based policy allows it.
- Something has to explicitly allow it, in an identity-based or resource-based policy.
I’ve simplified it a little (AWS has a few more layers for cross-account requests), but this covers the vast majority of AccessDenied errors you’ll ever debug. When one pops up, go down the list: is there a Deny somewhere? Is a guardrail blocking it? Is there actually an Allow for this exact action and resource?
Because Deny always wins, it’s a great tool for rules that should never be broken, no matter what else gets attached later. Which brings us to conditions.
Conditions
The Condition block lets a statement apply only in certain situations. Here’s one that refuses any action outside of Canada Central:
{
  "Sid": "StayInCanada",
  "Effect": "Deny",
  "Action": "*",
  "Resource": "*",
  "Condition": {
    "StringNotEquals": { "aws:RequestedRegion": "ca-central-1" }
  }
}
One word of warning if you try this for real: some AWS services, like IAM itself and CloudFront, are global and handle their requests in us-east-1. A blanket rule like this one blocks them too. Real-world versions use NotAction to carve those services out, and AWS’s documentation has an example you can start from.
A condition is made of three parts: an operator (StringEquals, StringLike, IpAddress, Bool, NumericLessThan and so on), a condition key (the thing being checked) and the value(s) to compare against. A few keys I use a lot:
| Condition key | Checks |
|---|---|
aws:RequestedRegion | Which region the request is going to |
aws:SourceIp | The IP address the request came from |
aws:MultiFactorAuthPresent | Whether the caller signed in with MFA |
aws:PrincipalTag/team | A tag on the user or role making the request |
s3:prefix | Which “folder” an s3:ListBucket call is asking about |
Two rules about how conditions combine, which confused me for ages:
- Different conditions in the same block are ANDed. Every one of them has to be true.
- Multiple values for the same key are ORed.
"aws:RequestedRegion": ["ca-central-1", "ca-west-1"]means either region is fine.
A real-world example
Let’s say an app needs to read and write files, but only in the reports/ folder of a shared bucket. Here’s a policy for its role:
{
  "Version": "2012-10-17",
  "Statement": [
    {
      "Sid": "ListOnlyTheReportsFolder",
      "Effect": "Allow",
      "Action": "s3:ListBucket",
      "Resource": "arn:aws:s3:::acme-uploads",
      "Condition": {
        "StringLike": { "s3:prefix": ["reports/*"] }
      }
    },
    {
      "Sid": "ReadAndWriteReports",
      "Effect": "Allow",
      "Action": ["s3:GetObject", "s3:PutObject"],
      "Resource": "arn:aws:s3:::acme-uploads/reports/*"
    }
  ]
}
Everything we’ve covered shows up here:
- Two statements, because listing is a bucket action and reading and writing are object actions.
- The first statement uses a condition so the app can only list what’s under
reports/, not the whole bucket. - The second only covers objects under
reports/, so the app can’t touch anything else. - There’s no
s3:DeleteObject, because the app doesn’t need it. If it does one day, adding it is a one-line change.
Habits that’ll save you pain
- Start small and add what’s needed. It’s far easier to add a missing permission than to figure out which of 40 permissions are actually being used.
- Let AWS help you tighten things up. IAM Access Analyzer can look at what a role has actually done (from CloudTrail) and generate a policy that only covers that. The IAM console also shows when each service was last used by a role, which makes it easy to spot permissions nobody needs.
- Test before you ship. The IAM policy simulator lets you ask “would this role be allowed to do X on Y?” without actually doing it.
- Use roles, not long-lived access keys. Roles hand out short-lived credentials automatically. Access keys sitting in a config file are how accounts get compromised.
- Be careful with
NotActionandNotResource. “Allow everything except this” grows every time AWS launches a new service, which is almost never what you want in anAllow. They’re much safer in aDeny. - Treat
"Action": "*"with"Resource": "*"as a red flag. That’s full admin access. Occasionally it’s what you want, but it should never be an accident.
Wrapping up
IAM policies look intimidating at first, but they’re really just lists of who can do what, to which resource, under what conditions. Everything is denied until something allows it, and a Deny always wins. Once those two rules sink in, AccessDenied errors stop feeling random and start feeling like a checklist.
Thanks for reading! If you have questions or spot a mistake, find me on twitter.